Initials and Heart Wedding Invitation

Custom Wedding Invitations

There are a number of things you can customize for your wedding day. You can have a custom dress made if you have the extra cash. You can customize your wedding shoes too. You can design shirts for the morning of your wedding. You can DIY your centerpieces, your altar, and lighting (like Mason jar candles!).

One of the most obvious custom projects for your wedding is your invitations! There are millions of resources out there for brides-to-be to design their own invites. Here are some of Bridal Party Tees’ favorite sites and stores for creating custom wedding invitations:

There are a ton of stores on Etsy that sell custom wedding invitations. These stores are operated by independent artists who use Etsy to reach future brides and display their work. You simply choose your favorite design (don’t worry, you can order samples before you make a final purchase) and add in your date, names, times, etc.!

Laser Cut Wedding Invitation
Initials and Heart Wedding Invitation

Minted wedding invitations are also designed by individual artists and sold through the site to brides like you.

Color Us Happy Wedding Invitation

Places like VistaPrint let you upload your own design or photos and customize your invitations from scratch. You can also choose to customize a design already featured on VistaPrint.

Horizontal Flat Wedding Invitation
However you choose to design your wedding invitations, just be sure that it’s a reflection of you and your wedding- that’s what it’s all about!


Read More

DIY Bride Wedding Hanger

One way that every bride can put a signature stamp on her wedding, (and at the same time not spend a fortune), is to tackle some do-it-yourself projects. One DIY project that caught our eye was the wedding name hanger! This DIY project should cost you no more than $10 and depending on your craft level, this project is pretty easy to complete!

Here are the items you will need for this project:

·      Set of wooden hangers preferably without the bar at the bottom

·      12 or 18 gauge wire, which is mainly used for picture hanging

·      A pair of regular pillars

·      Wire cutters

Step One: Clear a spot for this project and unwrap everything you have purchased.

Step Two: Role out some of the wire and wrap the starting end around one of the hanger notches. Loop the wire around the notch about three times, so it is secure and so the sharp end of the wire is not exposed. If it is easier for you, feel free to unroll about 6ft of wire, so you don’t have to work with the spool of wire hanging off the end (that’s what we did and it really helped).

Step Three: Once you have the wire wrapped around one of the hanger notches, make sure you have enough wire to spell out the name or word you want. Make sure to also leave enough extra wire space before you start bending your first letter in order to keep the word centered as much as possible.

Step Four: After you have allowed the extra wire for spacing, begin bending the wire to spell out the name or word you want. If this is your first time manipulating wire, don’t get too discouraged, it might take you a few times to get the hang of the process.  It took us three tries before we finally got the hang it!


Step Five: Once you have completed spelling out the name, save a little extra wire at the end of the name for centering and then begin wrapping the wire around the final hanger notch.

Step Six: Once the wire has been wrapped around the final hanger notch, cut the wire from the spool (if you left it connected in an earlier step).

Step Seven: Enjoy the custom hanger you just made for yourself or for one of your bridesmaids!


Tip: The project went so much better for us once we detached the wire from the spool. Once the wire was off the spool, it allowed us the flexibility to wrap the wire more easily and in different directions for some of the trickier letters like ‘b’ and ‘d’.

Final Notes:

This is just one of many ways you can create a wedding name hanger. We have seen some brides place the names over the sides of the hanger instead of having it completely centered and inside the hanger. You can also spruce up the hanger by painting it to match your wedding colors or by adding some ribbon to the top of the hanger.

And, even if you decide that bending wire is not your thing, try painting the hangers instead! Simply paint your bridesmaids’ names on each hanger and let it dry! It will be equally beautiful, a treasure she will cherish and maybe even something she will try for her or another friends’ wedding!

Painted Wedding Hangers
Check out more ways to save money and DIY at Bridal Party Tees’ Pinterest Board: DIY Bride

Read More

2013 Chocolate Kiss Sticker Templates

DIY Small Chocolate Kiss Sticker Templates

Chocolate Kiss Sticker Templates

Customize your own chocolate kiss stickers for the perfect wedding favor or for the bridal shower. We’ve made 4 templates for you to choose from. You can change the text, the font style and even the background color in Microsoft Word.

Downloadable Microsoft Word chocolate kiss templates: 

Black-Avery Round Label, 24 per 4×6 sheet, 5408

Magenta-Avery Round Label, 24 per 4×6 sheet, 5408

Mint-Avery Round Label, 24 per 4×6 sheet, 5408

White-Avery Round Label, 24 per 4×6 sheet, 5408

These templates are formatted for Avery Round Labels, 24, per 4×6 sheet, 5408. You can find those here:

http://www.amazon.com/Avery-Removable-Labels-Inkjet-Printers/dp/B0009JQ2JA/ref=sr_1_1?ie=UTF8&qid=1363033855&sr=8-1&keywords=avery+labels+5408

Steps for creating your chocolate kiss stickers:

  1. Open the template in Microsoft Word.
  2. Change the text, font or background color.
  3. Print the labels on an inkjet or laser printer. The templates are formatted for 4″x6″, so make sure to adjust your printer’s paper guide to fit the sticker page. Choose the “label” paper option and correct size under your printer presets. Make sure the sticker sheet fits snugly into the adjustable tray or feeder. If you have alignment issues you can play with the margins under: format>document.
  4. Place your customized stickers on the back of chocolate kisses or use them on other items!


Read More

Free Personalized Tic Tac Labels

Okay everyone, I hope you are ready for the latest free templates! I am really excited about these. I  have been thinking a lot about favors and how they can be so expensive. That’s why I created these templates. These are labels for Tic-Tac boxes. I created the labels in Microsoft Word, so they would be easy to edit.


The Word documents are attached below, and they are fully editable. But before we get to them, have you heard about us? We are Bridal Party Tees, and if you want to make hilarious custom tank tops for your Bachelorette Party, then you have come to the right place! We hope you check us out. Now onto the labels…


1. Peel off the original Tic-Tac label. You may need to use a warm wash cloth to get all the glue off but make sure you don’t get any water in the box.

2. Choose from one of the Bridal Party Tees design templates. You can edit the text in Microsoft Word.

3. Print out on 8.5×11, white full label sheets. You can buy these at any office supply store

4. Cut along the dotted line.

5. Peel off back and place on the bottle in the desired location. This label is sized to fit on the front or back of the Tic-Tac box.

Floral TicTac Template
Polka Dot TicTac Template
Stripe TicTac Template

Read More

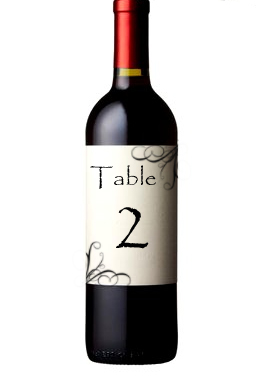
Free Wine Bottle Templates: Table Numbers

wine bottle

Brides, we’ve updated this post with great wine label design templates that you can edit yourselves! See the DIY instructions and files below.

Finding table numbers that are not going to fly away at an outside wedding can be a challenge. That is why I created these wine bottle labels. These wine bottle labels serve double duty at a wedding. They tell the guests where to be seated as well as treating them to a nice glass of wine. The best thing about these table numbers is that even if the guests drink the whole bottle, they are not going to fly away!

DIY:
1. Soak your bottles in a full sink of warm water, or you could use a tub to do many at a time. Soak for about an hour, then peel off original label. Scrub off remaining glue.
2. Choose from one of the Bridal Party Tees Wine Label design templates. You can edit the table number text in Microsoft word to make as many as you need.
To recolor in Microsoft Word: Click on the design to activate it then click on the format tab and then the recolor drop down menu. You can pick custom colors to recolor the background or the design and then you can change the live text to match.
3. Print out your chosen wine label template on 8.5×11, white full label sheets. You can buy these at any office supply store.

4. Cut along the dotted line.

5. Peel off back and place on the bottle in the desired location.

Check out our “ready to use” design templates below:
Orig Scroll Wine Label Template
Scroll Wine Label Template
Sketchy Scroll Wine Label Template
Circles Wine Label Template
Beaded Oval Wine Label Template
Beaded Wine Label Template

Twitter

Read More

DIY Persian Cotton Candy Wedding Favors

cotton candy

I am absolutely swooning over these Persian Cotton Candy favors from Eat Drink Chic! Not only are these favors perfectly packaged, they are filled with an exotic treat! Persian Cotton Candy, which is also know as Fairy Floss or “Pashmak”, is a gourmet cotton candy that resembles soft wisps of hair. That is why it looks so awesome in these translucent paper envelopes! Persian Cotton Candy is available in various colors and flavors are filled including Rose, Pistachio, and Vanilla. Any of these flavors would make for a wonderful treat, that is sure to make a lasting impression on your guests! Head on over to Eat Drink Chic and download a template for these super cute envelopes and labels. Plus, you will find step by step directions to help you through the whole project. Check it out!

Read More

Save the Date Postcard Template


post card

 I have to say that I am simply obsessed with all the  templates you can find on the Wedding Chicks blog. Like this breathtaking Save the Date postcard. This is such a fun and unique save the date that guests will really enjoy. I also, love the vintage feel of the postcard. I am sure all of you vintage lovers are simply swooning. I know I was! To get this template simply click here to be re-directed to the Wedding Chicks blog!

Read More

Icebox Cookie Favors


ice box cookies

 Looking for a great favor idea? Then look no more! Here is a great recipe I found on  Epicurious. Originally from Michele Adams’s and Gia Russo’s book Wedding Showers: Ideas & Recipes for the Perfect Part, this is one recipe that is sure to make an impression. The best part is that these cookies are made with ingredients that most of you will have already in your kitchen. They also give you the directions for creating this adorible packaging as well. Also, this recipe makes about 3 dozen cookie, so keep that in mind while you are preparing. Get the recipe and favor box directions!

Read More

Wedding Favor Cone Template


favor cone template

Here is another fabulous template from Martha Stewart. To create this favor cone you just need the  favor cone template and directions, crate paper, card stock, a high quality printer, ribbon, and some goodies to stuff in the cone. These make an absolutely gorgeous favors. Stuff them with candies, nuts, or other goodies. These would also make great holders for bird seed or rose petals for your grand exit. The possibilities are endless! Have fun and enjoy. To get the directions and template, simply click here.

Read More