Nautical Wedding Inspiration

It doesn’t matter if you are marrying a sailor or simply just love the beach. Nautical themed weddings are trendy no matter if you go with the classic navy blue or mix it up with coral and mint. The nautical theme is versatile and very easy to personalize to give your guests an experience they’ve never had before.  Anchors, stripes, and boat knots are just a starting point but make your experience extra unique by customizing Nautical Themed Bridal Party Shirts.  Bridal Party Tees has a great selection of nautical art including knots, anchors, and boats to help achieve the exact theme you are looking for.

Bridal Party Tees has put together a Nautical Theme Inspiration Board to help infuse your wedding with a unique and classy look inspired by the sea. So what are you waiting for? Drop the anchor, tie the knot, and set sail before the veil!

 Nautical Chalkboard Print // Cake // Shoes // Bride Tank Top // Invitations // Stamp // Table Numbers

Read More

TRENDING: Orchid Weddings for Spring!

Radiant Orchid
Earlier this year color experts, Pantone, announced that “radiant orchid” was the color of 2014. Since then, we’ve seen it pop up everywhere from New York Fashion Week to design blogs. And it’s no surprise that we’re starting to see the vibrant color make an appearance in everyone’s Spring wedding plans (and Pin boards)!

Pantone's Orchid

Orchids (the flowers) have always been a go-to for wedding decor so it’s a small stretch of the imagination to picture a beautiful Spring wedding decked out in orchid orchids and various other romantic shades of the purple. Orchid embodies what Spring brides are always searching for: blossoming radiance. Set on a background of an ivory and gold church or outside amongst green trees and grass, the color pops and gives life to your venue and your ceremony.

How can your wedding radiate with Orchid?

Just about every way imaginable.

  • Accent your perfect Spring bouquets of orchids with purple eyeshadows and manicures for you and your bridal party.
  • Consider a wedding dress with a purple sash or bow. Matching heels that accent the feature will really make your look pop!
  • Your bridesmaids will love you for picking a dress color that works with various skin tones and hair colors.
  • Your center pieces of cascading orchids and softly lit candles will definitely add a romantic touch to your reception.
  • There are tons of delicious ways to incorporate radiant orchid into your wedding cake design. Flower appliques, purple icings, or adding purple berries perfectly combine the color of the year and the freshness of a Spring wedding.
  • Purple desserts, aisle decor, invitations and programs, lighting and even drinks are all an easy way to add more of the decadent color to your wedding.
  • And finally, whether it’s the morning of your wedding, your bachelorette party, or just gifts for your ever helpful bridesmaids, customize some of our many bridal party shirts that we offer in the purples you love.

Remember the staples of any Spring wedding is love and knowing it’s the blossoming of something wonderful!

Read More

Personalize Your Soda!


soda

As you know, I am a big fan of personalizing the small details of your wedding. That is why I love how Jones Soda allows you to personalize your pop labels. These would make for great wedding favors or as drinks for your guests. They would be absolutely perfect for a casual outside wedding. However, I think I would really like them for a soda bar. You can get a variety of flavors all personalized with different pictures of the couple or images that play off the theme of the wedding. Then arrange them into an old fashioned soda bar with a unique modern twist. I love it! You can personalize your soda on the Jones Soda website. The soda is about $29 for a 12 pack. Start Designing!

Read More

Guest Book Alternative ~ Storyline

Here is a wonderful wedding idea from Project Wedding. In lue of a guestbook you can create a storyline. I love this idea because instead of collecting a list of names this allows your guests to share a story about the couple. This makes the process more intimate and wonderful for the bride and groom. They can look back on the stories and read the memories that their guests hold dear. It is also a fun way for guests to really get to know the couple. They are sure to have fun reading all of the stories that people remember. For more pics and directions click here!

 storyline

Read More

Michelle Rago Ltd. Event Planning and Design

Michelle Rago is an event planning and design company that also does flower design.  Their mission is to transform their client’s vision into a magical well planned event. I have to say that Michelle Rago Ltd. is one of the best in the wedding business. Their events are beautiful beyond words and their attention to detail is exceptional! They company specializes in destination events which can been seen from this featured wedding from the Bahamas. I adore the way that sand and shells are featured in all the details of the wedding. It truly gives the wedding a beachy feel in a sophisticated way. I think my favorite part is the escort card display. I love how the cards appear to be submerged in sand and the shells serve as a beautiful embellishment.

wedding beach

 The centerpiece pictured below is absolutely breathtaking with the orchids and shells. The colors mesh together perfectly. Actually, the whole color scheme of this wedding is simply perfect and plays off the turquoise waters of the Bahamas.

 beach wedding


Twitter


Read More

Free Stir Stick Template

stir sticks

pic

I love personalized stir sticks. They are a great way to add a personal element to your wedding. They are a small detail that is sure to impress your guests. It is also another little way that you can show gratitude or send a personal message to your guests. That is why I created these cute little templates. To create your stir sticks simply right click on the design that you like. You can then choose to save the file and print it from there or you can copy and paste the image into Microsoft Word or Photoshop. If you choose this option you can paste multiple images on one paper to reduce the use of paper.  After you have your images, cut them out and attach to a stir stick or straw with double sided tape. You could also choose to print the template on sticker paper to make it easier to attach. Enjoy!

best wishes 1

best wishes 2

thank you

thank you 2

love is sweet straw

sweet

love is sweet3


Twitter


Read More

DIY: Monogrammed Lanterns

lanterns

By now, I am sure you all now that I am absolutely obsessed with candles and lanterns. I love, love, love them! They give off such a gorgeous glow and really set the mood for a wedding. That said, every time I find a beautiful lighting idea I just have to share. This idea is surprise, surprise, a lantern idea! This beautiful design is created by A Field Journal and can be found on Project Wedding. So, check out Project Wedding for more pictures!


Materials:
a. Battery operated tea light, do not use conventional tea lights (app. $1 each)
b. 2 brads ($3.00 for 100)
c. Ribbon, several inches in length
d. Strip of vellum 2.5″ by 5.25″; trim one of the long sides with decorative scissors if desired ($10.00 for 50 sheets – each sheet will easily make 5 lanterns)
e. Double stick tape


Supplies for optional embellishments:
f. Needle and thread
g. Paper flowers
h. Pin
i. Printed letter

lantern

Directions:
1. Wrap strip of vellum around battery operated tea light, adhering with double stick tape.
2. Using brads attach length of ribbon to “lantern” to form a handle from which to hang.
Optional Embellishments:
Pinhole Monogram: Before assembling lantern, use a pin and a printed letter as a guide to punch a monogram in the vellum strip.
Flowered handle: After the lantern is assembled use a needle and thread to tack paper flowers to ribbon handle.
All instructions and pictures courtesy of Project Wedding.


Twitter


Read More

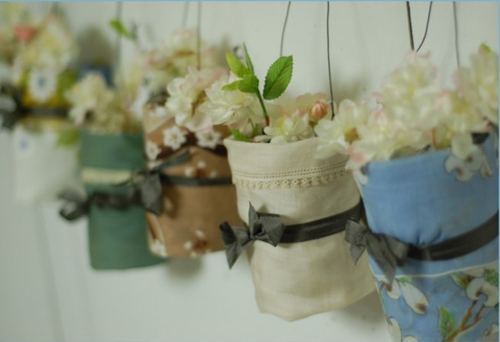
DIY Hanging Handkerchief Vases

jar

I found this beautiful DIY wedding idea on Once Wed. This is a design that was created by Laurie over at Etsy and I have to say that it is perfect!This DIY project has everything I love. It is easy, beautiful, and not outrageously expensive. Enjoy!

Materials:
Several Canning Jars (1/2 pint wide mouth with the straight sides)
Several Handkerchiefs (in coordinating colors)
Ribbon
Bailing Wire
Rubber Bands
Flowers
Wire Cutters
Scissors
Iron and Ironing Board
Resources: Canning jars are easy to find at yard sales and thrift stores, so are handkerchiefs. Bailing wire is available at any hardware store.

jar2

Directions:
1. Press all of your handkerchiefs flat. (if you’re going to be use these in a humid location, I would suggest using a little spray starch to help keep them crisp)
2. Fold the bottom of your handkerchief up (see figure 1) and the top of the handkerchief down (see figure 2) to create a band of fabric that is the same height as the jar. Press the folds.
3. Cut a 2 1/2 foot length of bailing wire. Wrap it tightly around the grooves in the top of the jar, then create a hanger. (see figure 3)
4. Wrap the folded handkerchief around the vase and secure it with a rubber band. (see figure 4)
5. Cut a length of ribbon (about 18 inches or so) and tie it around the vase to conceal the rubber band. Tie the tails in a bow. (see figure 5)
6. Add a little water in the bottom of your vase, insert the flowers. ( see figure 6)
7. Create a grouping of coordinating vases and hang from a tree, and arbor, or from the ceiling.
What it Cost:
Handkerchiefs $.25 – $3.00 each
Ribbon $.25 a yard
Bailing wire $3 for a 50 foot spool


Jars, if purchased new are about $9 for one dozen (but they are easily found for much less when used)


Twitter


Read More

DIY Tin Can Table Numbers

tin cans

Here is a super cute and cost effective idea for table numbers. These tin can table numbers are courtesy of the 100 Layer Cake blog and they are too cute for words! I love how they are inexpensive and eco-freindly.


Materials:


drill (with an appropriately sized bit)
gold spray paint
tape
candles
a ruler
letter size colored paper
spray mount
exacto knife
cutting mat
and your number stencils, which you can download here.


tin can2

Instructions:

Step 1: Tape off the inside of your cans so no spray paint gets inside. Spray the outside of each can with the gold spray paint (or any color you like). Be sure you don’t hold the spray can nozzle too close to the tin can, which can make for drippy, runny lines down your pretty table numbers and no one wants that.


You may need to do two or three coats depending on how opaque you want to the color to be.


Step 2: Once your cans are dry, wrap your printed number stencil around each tin can.


Step 3: Drill. Yay! Start by drilling the outline of the number first (following the stencil line), and then work your way in. It certainly doesn’t have to be perfect, but the more holes you can drill, the more light your can will give off.


Step 4: Slide your colored paper into the can on the opposite side as the number. Mark the paper with the appropriate height and width (you don’t want it to cover your numbers. Next trim the paper to the correct size using your cutting mat and exacto.


Step 5: Spray mount the trimmed paper to the inside of your can (opposite the number). And you’re done! We used red paper but you can of course use whatever color you like. If you’re using a color you’re not sure about, consider doing a test can first and lighting it that night to make sure you like the look before you finish the rest of your numbers.


Click here for more pics and source.


Twitter


Read More

2009 Wedding Trend Alert~ Strike a Pose

backdrop

(picture source)

Everyone takes a ton of pictures at weddings. Nothing new and different about that! However, brides and grooms are now setting up areas at their reception designated for striking a pose. Many couples are creating an area with a beautiful backdrop to take pictures of their guests and to take some formal pictures. If the picture station is decorated right, it can become a beautiful decoration in it’s self. This is true in the above picture. In this picture Lena and Joshua (the bride and groom) are posing against a backdrop of Marimekko fabric reproduced from an early-1960s pattern. This makes for a beautiful backdrop that helps create the retro atmosphere at the reception.

Twitter


Read More