Blog Category : DIY, Decor --- Blogged by : natasha on April 30, 2009 at 10:30 am

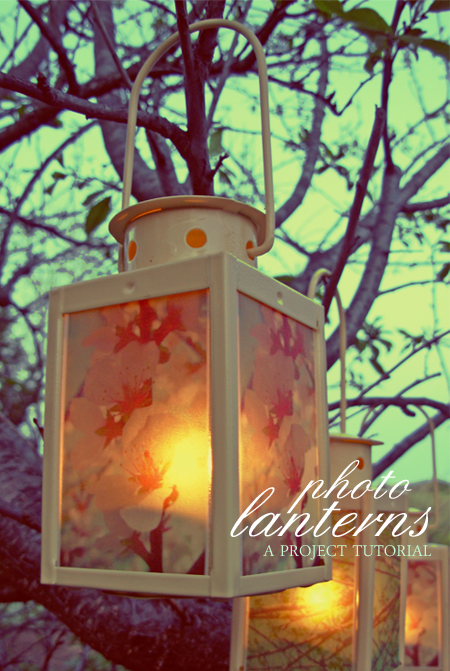
I fell in love with these lanterns by A Field Journal as soon as I laid my eyes on them at the Decor8 website. I do not care that my wedding is over, I want to make some just for my backyard! I absolutely love the soft illumination of the picture through the lantern. It makes such a beautiful light. These would be perfect for a vintage or county themed wedding. They would make great outside decorations or serve as a wonderful way to light the path to beautiful cottage type venue.
How to Make…

Materials:
- Store bought lanterns (glass votives are an alternative)
- Spray adhesive (suitable for paper and glass)
- Vellum
- Digital images
- Printer
- Battery operated tea lights
- Scissors/Paper cutter
Instructions:
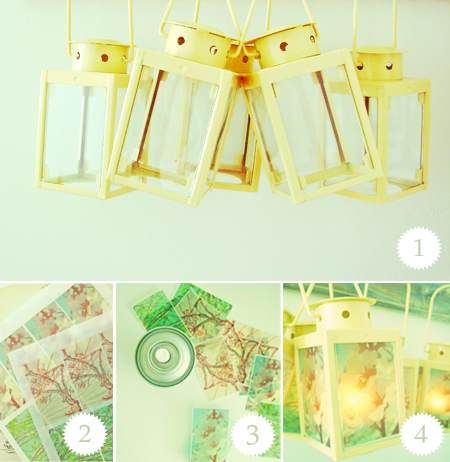
- Step #1: Carefully remove glass from store bought lanterns. (You may want to wear gloves.) Alternatively, cylindrical glass votives could be used, just be sure that whatever vessel you select has straight sides so the vellum will adhere smoothly.
- Step #2: Measure the surface to be covered, and print appropriately sized images on 8.5 x 11 sheets of vellum.
- Step #3: Using scissors or a paper cutter, cut out each image. Coat glass with spray adhesive and immediately apply vellum. Let dry.
- Step #4: Replace glass in lanterns, add a battery operated tea light and enjoy!
Okay guys, This one project I am dieing to try myself! Maybe Mother’s Day presents…. If you give it a try please send a pic my way. I would love to see how they turn out and maybe feature your design on Bridal Party Tees! Happy Crafting!
Important safety note: Remember everyone – use only BATTERY OPERATED TEA LIGHTS. I don’t want anyone to burn down their yard or home.
(images from Olivia Kanaley)
Blog Category : Decor, Wedding Stories, Weddings --- Blogged by : natasha on April 30, 2009 at 6:26 am

Photography by Chrissy Lambert; Floral Design by Yvonne Chapman; Shot at the Loulu Palm Estate, Oahu’s North Shore; Chef + Food Stylist Michelle Nakaya; Stationery by Stacey Nomura
This beautiful ocean inspired wedding decor was featured by Pacific Weddings.The floral design by Yvonne Chapman is simply beautiful and captures the playful lines and colors of a day at the beach. I love the way the different colors of sand are combined in the vases to make beautiful lines that mimic the waves in the ocean. Here is how Chapman describes this design…
“When I think of sand, I am reminded of the playful energy and warmth felt at the beach… vibrant colors of orange and yellow signify the sun and the Mokara orchids give this table a whimsical feel,” says Honolulu designer, Yvonne Chapman of the eponymous Yvonne Design. Handblown glass vases stand tall in three modern shapes that mimic the sensuous qualities of the ocean. Modeled after traditional chemistry lab beakers, the stems of each vase rise delicately above vibrant arrangements of dahlias, calla lilies, roses, celosia, and hybrid ranunculus in bodacious summer hues. Mokara orchids, wired discreetly to each vase top, appear to float over the table. The artistic waves of the sand create a modern still-life with layers of sand in tangerine, sunny yellow and bright white. Playing off the “sands of time” theme, Stacey Nomura of Bradley & Lily Fine Stationery, created circular tags that read, “time of your life,” which are tied to miniature hourglasses. These unique parting gifts rest at each place setting and promise to be an interesting conversation piece among celebrants.
The design ties together perfectly and the vibrant colors really make the design. I have to say my favorite part is the use of the colored sand. It is breathtaking!

Blog Category : DIY, Tips, Uncategorized, Wedding Favors --- Blogged by : natasha on April 30, 2009 at 5:27 am

No matter what favor you choose it will be the wrapping that the guests will see first. That is why clever wrapping will make memorable wedding favors. To achieve this look for your favors, simply take clear cellophane and wrap the favor. Adorn with slim silver paper and add a favor tag with beautiful calligraphy. Last, tie the ends metallic cord. The favor pictured above holds marshmallows, but you could switch up the favor to meet your tastes. Just remember that the wrapping will take the shape of the favor.
pictures from Martha Stewart.com
Blog Category : Announcements, Special Offers and Updates --- Blogged by : natasha on April 29, 2009 at 10:45 am

Click the picture above to go to the sale or click here!
Blog Category : DIY, Uncategorized, Wedding Favors --- Blogged by : natasha on April 28, 2009 at 4:53 pm

Are these boxes super cute or what? You have to give it to Martha Stewart, she has a creative mind like no other. These boxes are decorative and gorgeous. They are sure to impress your guest. Especially when you tell them you made them yourself!
Pyramid Box
1. Enlarge the template, trace it onto paper, and cut it out. Make slits as marked with a utility knife. Using a bone folder, score the paper on the dotted lines.
2. Fold up all four flaps, forming a pyramid. Cut two pieces of ribbon, each one long enough to wrap around the box. Starting on what will be the inside of the box, slip one ribbon through a slit, wrap around outside, and slip through opposite side. Pull ribbon so two sides come together; tie. Thread second ribbon through remaining two sides, wrapping around outside; pull ends together, and tie. Tuck excess ribbon into box.
“Kiss” Box
1. Enlarge the template, and trace it onto paper. Working just outside the lines, cut out the shape with paper edgers of your choice. Punch holes through ends of flaps as marked. Using a bone folder, score paper on the dotted lines.
2. Fold up all flaps. Cut ribbon a little bit longer than the diameter of the bottom of box; thread it through all the holes. Cinch two ends of the ribbon until sides close the “kiss.” Tie a bow.
Long Box
1. Enlarge the template, and trace it onto paper. Cut out the left and right flaps with scissors. Using paper edgers of your choice, cut the top and bottom flaps just outside the lines. Punch holes in all four flaps as marked. Using a bone folder, score the bottom on the dotted lines.
2. Fold in the left and right flaps. Slide a short length of silk ribbon through the two holes, and tie the two sides closed. Fold top and bottom flaps in; tie with a second piece of silk ribbon. Finish with a bow and a little paper “button” or tag.
Blog Category : DIY, Decor, Stationary, Templates, Uncategorized --- Blogged by : natasha on April 28, 2009 at 4:32 pm
I had a request for more table numbers from yesterday’s design. So here are numbers 13-20 from the table number design post from yesterday. I have also included a blank design in case you have more numbers to add. Enjoy, and I hope this helps Courtney!
Blog Category : Bride, Hair, Uncategorized --- Blogged by : natasha on April 27, 2009 at 2:37 pm
I could not resist! Here are some more beautiful birdcage veils. Some of my favorites are pictured below, but you can find lots more on Etsy!

From Brenda’s Bridal Veils and From QG Designs

Blog Category : Bride, Hair, Trends, Uncategorized --- Blogged by : natasha on April 27, 2009 at 2:07 pm

I have to admit that I was not sure if I liked bride cage veils at first, but I have seemed to fallen in love with them lately. I think that they make a beautiful and powerful statement. They look amazing with vintage inspired gowns, however I think it is the bride that really makes them shine. If it is the bride’s style and she wears it with confidence, there is nothing more beautiful. If you love the bird cage veils as well, Powder Blue Bijoux on Etsy has some amazing styles. They are all hand made and detail in the veils are exquisite! Check them out!

Blog Category : DIY, Decor, Tips, Uncategorized --- Blogged by : natasha on April 27, 2009 at 10:42 am

This beautiful DIY project comes from the awe inspiring Mathew Mead. To create this beautiful design Mathew cut a piece of lace to fit the cylinder, then tied it with a bit of seam binding. This is a simple and quick project that is even more beautiful when lit. The lace creates a pattern on the surrounding surface, that when lit is simply stunning. Group a bunch of varying sized candles together to make a one of a kind centerpiece, scatter them throughout the reception, or simply arrange around a floral centerpiece to make a breathtaking statement.
Blog Category : Decor, Uncategorized, Wedding Stories, Weddings --- Blogged by : natasha on April 27, 2009 at 10:21 am

Sheridan and Bo had a beautiful wedding at The Biltmore, a Four Seasons Resort in Santa Barbara CA. Sheridan wore a strapless Elizabeth Fillmore gown with ruffle detailing on the bodice and skirt. The bride’s hot pink nails peek out from beneath her bouquet of peonies and orchids. The ceremony was all white, and to achieve a traditional look of a church floral designer Mindy Rice brought some of that ambiance to the oceanfront outdoor setting by creating beautiful floral arches where the couple would say their vows.The couple and their guests went from the subdued ceremony to a vibrant lunch reception. Eye-popping red linens and chair covers were paired with flowers in hot pinks and oranges. However, I think the beautiful aqual cake stole the show in the reception–not counting the bride of course. After the ceremony, Sheridan swapped her elegant cathedral-length veil for a one-of-a-kind fluorescent feather headpiece by Leah C. Couture Millinery which was too beautiful for words.

Pics and Wedding Story from Brides.com
- September 2010
- August 2010
- July 2010
- June 2010
- May 2010
- April 2010
- March 2010
- December 2009
- September 2009
- August 2009
- July 2009
- June 2009
- May 2009
- April 2009
- March 2009
- February 2009
- January 2009
- December 2008
- November 2008
- October 2008
- September 2008
- August 2008
- July 2008
- June 2008
- May 2008
- April 2008
- March 2008
- February 2008
- January 2008
- December 2007
- November 2007
- October 2007
- September 2007
- August 2007
- July 2007
- June 2007
- May 2007
- Dottie Johnson: This morning my good friend asked me...
- Flashgames: Awesome website and post! ill be adding...
- Willa Camilli: This is an excellent blog here! I...
- ANN: Natasha your a star!!! I'm getting married...
- divorce resources for men: Informative writing on this subject. Bookedmarked your...
- hampaan poisto tulehdus: I was golden to win a train...
- Cleansing Colon: Your page is so excellent! You...
- Ashleigh: These are really pretty! Where can I get...
- fashion jewellery: I really like some of these dresses,...
- Courtney: Thanks so much for the chance! ...

