Do it up Right, 20 Fab Wedding Hairdos

Wedding planning brings months of worry over the dress, the flowers, the cake, and the weather. Let one of your most important considerations – your hairstyle – be stress-free. Whether you have short or long hair, want something fancy or natural, below you’ll find a hairstyle to suit every style. If you’re looking to do your own hair on your wedding day, research the how-to tips and practice creating the look a couple of times before the big day. If you’re working with a stylist, show them a picture of what you’re looking for and have them try out a couple of options. Do the legwork ahead of time and you will wake up worry free on your wedding day.

princess nouveau

1. Princess Nouveau: If you have long hair with a medium thickness, consider a loose style with sexy, large curls accented by barrettes, a subtle hairclip or a delicate tiara. If you have shorter locks, ask your stylist about hair extensions.

pony

2. Long, Elegant Ponytail: This low-ponytail with a tasteful pouf in the front is extremely elegant and reminiscent of a style popular now on the runway and in photo spreads. Look casual or done-up while accenting your facial and jaw lines.


edgy pony

3. Edgy Ponytail: Nothing is more in these days than deliberately messy hair. Give yourself a graceful edge with this style.

angel

4. Angel: Not everyone will be able to pull this one off, but if you were one of the chosen few blessed with long, voluminous tresses, check out this glamour-defining, loose pull-back.

audrey

5. The Audrey Updo: Dramatic and stylish, this updo is reminiscent of the “Breakfast at Tiffani’s” actress. Ask your stylist for a short fringe of blunt-cut bangs to complete the look.

texture

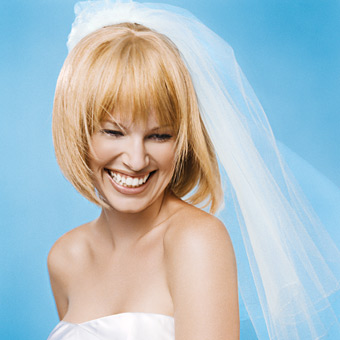
6. Modern Texture: Short-haired brides will love this look – an angled cut tousled to bring out texture. Whether loose or pinned, this style is fresh, fun, and cute.


chigon

7. Modern Chignon Updo: Take a ride back to the 1940s with a classic chignon hairstyle. This example incorporates a twist and some feminine accents. It’s a demure look that is perfect for a veil or an off-the-shoulder dress. If you’re going for a vintage look, take it all the way by wrapping your hair in a thin hair net.

cone

8. Princess Updo: An exaggerated take on the Audrey Updo, this cone-shaped, classic sweep is versatile. Ideal do for a fairytale wedding or urban-chic nuptials.

long

9. Long and Tussled: Gentle and light, this style pulls hair back from the face and lets long curls fall down the back. With innocence and polish, this technique is a great option for an outdoor or casual wedding.

dcunstructed

10. Deconstructed Updo: It looks complicated, but this updo is simply a French twist that turns into a bun. The trick to this style is that the hair isn’t pulled too tightly around the face. Dramatic and glamorous, this style pulls attention toward face and neck lines.

eva

11. Celebrity Style Updo: You’ll feel almost-famous in this loose and textured hairdo, aptly referred to as the Celebrity Updo for it popularity among Hollywood-types.

straight

12. Modern Bride: Straight, long and natural, this style demonstrates confidence and charm. Let it all hang!

bangs

13. Vintage Charm: This traditional pull back is enhanced by the delicate curls in the bun and a jeweled accent. Whether you have bangs or don’t, this is a classic look that won’t disappoint.

spunk

14. Starlet Bob: Cute and carefree, this style is excellent for short hair. Extremely fashionable, this style will go with just about any dress. The angled curls frame the face expertly and show a lot of spunk.

Jessica Simpson

15. Jessica Simpson: Get inspiration from one of Hollywood’s most hair-perfect stars, Jessica Simpson. Her stylist Ken Paves is almost as famous as she is at this point. Known for his loyalty to hair pieces, Paves constantly creates a myriad of looks for Simpson – all of which would be easily translatable to a fashion-forward bride.

flower power

16. Flower Power: Getting hitched on a beach? Consider adding floral accents to the style of your choice. Flowers can be placed in updos, as well as flowing locks. Peruse these styles for inspiration.

posh

17. Go Posh: Copy the first lady of soccer with an angled bob. Victoria Beckham rocks this look with flair and many other starlets are following her lead. This style speaks for itself and requires little maintenance.

oscar

18. Oscar Updo: Red-carpet ready hair works for the chapel aisle, too. Easygoing, yet elegant, this style is multitalented and would complement most dresses.

hair

19. Elegant Cascade Take you hair to new heights with this pinned all over look accented by flowers.

pont

20. Simplfy: Look beautiful with this simple ponytail accented by loose locks framing the face and barrette. A stress-free style that shines.

Get the Look from Smashbox

smashbox

Face

Apply PHOTO FINISH FOUNDATION PRIMER LIGHT all over face for a smooth, matte look. Using POWDER BRUSH #1, dust FUNCTION 5 SELF-ADJUSTING POWDER FOUNDATION over face. Get a natural bronze glow by dusting DECADENCE BLUSH in ECSTASY over cheeks using FAN BRUSH #22. 

Eyes

Apply fake eyelashes for ultra-lush lashes. Line eyes with CREAM EYE LINER in LAVA using EYE LINER BRUSH #8. Using DEFINER BRUSH #15, apply the khaki shade from EYE SHADOW TRIO in VIEWFINDER from lashline to crease, then apply CREAM EYE LINER in IMAGE over the shadow. Using ARCED LINER BRUSH #21, sweep JET SET WATERPROOF EYE LINER in MIDNIGHT BLACK over top lashline and along the inner rim of eye. Apply 2 coats of BIONIC MASCARA for extra intensity. 

Lips

 Get a pale nude lip by applying PHOTO FINISH LIPSTICK in ELEGANT, followed by a dab of LIP ENHANCING GLOSS in ILLUME on the center of bottom lip.

source

Get the Look from MAC

MAC 

EYES
Dust Brule Eye Shadow all over eye lid with the 239 Shading Brush. Using the 222 Tapered Blending Brush, apply Omega Eye Shadow following the natural contour of your eye and blend up to brows. Deepen the crease in the outer corner of your eye by blending in Cork Eye Shadow. For highlight add a light touch of Naked Pigment to the center of the lid, inner corner of the eye and browbone. Fill in brows with Omega Eye Shadow. Apply 7 Lash to top and bottom lashline. For the bottom lashes, trim 7 lash into small pieces and apply each piece with a small space in between. Complete eyes with one coat of Coal Black Pro Lash to top and bottom lashes. 
 
CHEEKS
Softly contour cheekbones and under jaw line with Harmony Powder Blush using the 168 Large Angle Contour Brush. Apply Tenderling Powder Blush all over cheeks. Highlight cheekbone and temple with Shell Cream Colour Base. 
 
LIPS
Smooth on Please Me Lipstick and top with C-Thru Tinted Lipglass. 

How to Add Volume to Flat Hair

volume


Is your hair lacking in the volume department? Here are some tips and some secret techniques that help pump up the volume!
 
Add Some Color: Adding highlights or lowlights gives your hair dimension. Hair that is all the same color appears flatter.  When adding dimension to the hair, you are creating an illusion of thicker hair with more lift. Multi-tonal hair works like an optical illusion on the eyes, they perceive movement, even where it does not exist.
 

Layer it Up: Hair styles that have short layers will add volume to the hair, especially those that have shorter layers in the crown. The shorter the layers go, the more lift you will have, but keep in mind if you go really short it will create a punkish pixie look. Also keep in mind that the layers should go with the hairstyle. Some styles do not work well with short layers, so you may have to opt for longer ones or a different style. 

Tease it Up: Don’t get scared, we do not mean 80’s style teasing! If you have an area that just needs a little more volume, take that section and tease the under side of the hair strand, then spray with hair spray, let the hair spray dry for a minute, and then smooth out the top side of the hair strand. This technique will add a little more volume to those trouble areas.
 
Use Do Dads: Do Dads, are simple hair combs with hair extensions attached. You choose the color to match your own or a contrasting color for an edgier look. To get the lift, you fasten it on just as you would a traditional hair comb by combing it in against the grain of your hair.
 
Use a Volumizer: Volumizers are designed to add lift and body to the hair. They are available in gels, mousses, and spray versions. These products are applied to the roots of towel dried-hair, lifting hair with your fingers as you apply.  Our favorite is the spray mousses. These products make it easier to apply because you simply spray it on. This comes in handy in those hard to see spots in the back of your head.  

Use a Curling Iron: If used properly, a curling iron will give a great lift. This is because of the intense heat generated. The correct way to use a curling iron is to start at the crown of the head, take hold of one-inch sections of hair and lift vertically, wrapping hair around the iron, as close to your scalp as you can. Then spray with a firm hairspray, for a firm but still flexible hold.
 
Hot/Cold Blow-Dry: Blow-drying will give you a good lift if used with a medium to large round brush. The trick is to place the brush as close to your scalp as you can, then pull your hair straight up from the base of your head, following the brush with a blow dryer on high heat, and then follow with a blast of cool air which “sets” the style.
 
Use Velcro Rollers: A few strategically placed Velcro rollers will give your hair terrific volume. After hair is washed and blow-dried, curve one-inch sections of the hair you want lifted around the roller (small rollers for a slight lift and large for a higher lift). Three or four rollers should do the trick. Leave rollers in for about five minutes, remove and arrange newly lifted hair with your fingers. It’s recommended you don’t brush at this point, as brushing could “deflate” the set.


Bring the Spa Home

Would you like to indulge in a spa treatment, but don’t want to pay the prices at the salon? Well now you can, thanks to the Spa Index Website. This site gives you homemade recipes for facial masks, foot scrubs, body scrub, and much more. Mix up a few of these little beauties and invite your bridesmaids over for a before the wedding spa day. Our favorite recipes are listed below, but check out the site and find something that fits your personal needs.http://www.spaindex.com/HomeSpa/HomeSpa.htm
Frozen Egg & Honey Facial Mask
Recommended for dry skin
1 egg
1/2 cup coconut oil, melted (but not hot)
1 tbs. honey

Step 1: Beat the egg in a small bowl until frothy and well-mixed. Slowly add the liquid coconut oil and honey, beating until your mask is the consistency of mayonnaise.

Step 2: Take an empty toilet tissue roll and set it up right in a clean bowl. Spoon mixture into the cardboard toilet paper roll (or consider using an empty deodorant container). Place tube, in the bowl, in the freezer overnight.

Step 3: To use, peel away just the top 1/4 inch of the cardboard roll and smooth the frozen stick over your face (think of it as a push up pop). Leave your mask on for 5 to 10 minutes, then rinse off with warm water. Return the cream stick covered with plastic wrap to freezer between uses. Particularly soothing on a sunburn. Keeps indefinitely.

This decadent mask is actually an excellent moisturizer — it leaves your skin baby soft. Recommended for normal skin.
1/3 cup cocoa
3 tbsp. heavy cream
2 tsp. cottage cheese
¼ cup honey
3 tsp. oatmeal powder
Mix all ingredients together and smooth onto face. Relax for 10 minutes, then wash off with warm water.

Strip it Off! Pore Cleaning Strips
This recipe makes a pore cleaning “strip” which works just like those sold in popular drugstores.

1 T Knox unflavored gelatin
1-1/2 T milk
Mix two ingredients and microwave for 10 seconds to slightly warm. Using a clean cosmetic brush, apply to nose and chin area. Avoid delicate eye area. Rinse brush immediately. Allow mixture on nose and chin to dry for 10-15 minutes. Mixture will dry quite stiff and form a “stiff film.” Peel off the film and stare at all the little porcupine quills that used to be in your nose pores (one of the chief entertainment factors with B’Strips!).

END OF SUMMER ALMOND BODY SCRUB

As the end of the summer season approaches, many of us are sporting that attractive tell-tale sign of fun in the sun: Peeling skin.

Spa Index has an excellent recipe for an Almond Body Scrub to gently and thoroughly exfoliate the top layer of dead skin cells. Body scrubs feel wonderful and relieve the itch of flaking skin.

2/3 cup ground almonds
1/3 cup oatmeal
Plain yogurt, milk, or buttermilk, sufficient to make a paste
Essential Oils for scent (optional)
Combine the dry ingredients in a blender or food processor until they are reduced to a coarse meal. Keep this “scrub base” in a glass jar with a screw top in your refrigerator until ready to use. When you want to use the scrub base, scoop out 1/4 cup into a small bowl, and stir in enough of the liquid ingredients (vary it by what you have on hand — yogurt and milk are best, but water works) to make a paste. Yogurt and milk are natural exfoliates known as alpha hydroxy acids, and they will slough off dead skin cells even without the scrub. Scoop up the paste with your hands or a washcloth, and rub over your body to exfoliate peeling skin. Rinse thoroughly.

Beach Sand Foot Scrub

2 Tablespoons Canola oil
2 Tablespoons dry beach sand
3-5 drops rosemary oil
The next time you decide to spend the day at the beach, take advantage of the “on location foot treatment.” Brazilians are known for scrubbing their entire bodies, particularly the feet, deep into the sand while they relax on the beach. When going to the beach, take a small vial of ingredients with you: 2 tablespoons of canola oil (or use your suntan oil!), and, a small vial of rosemary oil — or premix and take one vial. Once at the beach, use an empty container (a soda cup is fine) to mix the ingredients together. Mix into a paste. Massage sand scrub onto feet (and elbows), concentrating especially on problem areas. Rinse off in the foamy waves, pat dry with your beach towel.

AROMATIC MILK BATH

Use this mixed concoction immediately after making it, for soft and silky skin.

1 egg
1/2 cup light olive oil
1 tablespoon glycerin
1/2 cup dried milk powder
1 drop jasmine essential oil
1 drop rose essential oil
6 drops lavender essential oil
2 cups distilled water
Beat together egg, olive oil, glycerin and milk powder with a whisk or hand held beater. While beating add essential oils. Continue beating until a smooth paste forms. Add the water a little at a time, continuing to beat. Immediately add to your warm drawn bath (be careful…if the water is too hot you’ll make scrambled eggs).

Nail Brightener

1 denture tablet
1 cup warm water
1-2 drops essential oil
Saturate one denture tablet with a few drops of essential oil of your choice. Drop the tablet into a small bowl of warm water. Soak fingertips 10 minutes. Do not keep mixture. Discard after use.

Overnight Foot Masque

1/4 cup Almonds
1/4 cup Dry Oatmeal
3 tablespoons food grade Cocoa Butter
2 tablespoons Honey

Process almonds in a blender or coffee grinder until finely ground. Set aside. In the same blender, pulse your oatmeal until of the same consistency. In a bowl, combine ground oatmeal, cocoa butter, honey and ground almonds. Rub into your clean feet, step into cotton socks, and leave on overnight. The next morning, remove the socks and rinse feet in cool water. Pat dry. We recommend you not remove the socks until you’re standing in the tub!